
Tremolo Technique Overview and Checklist
Contents
- Using the metronome
- Is my hand position correct?
- Do I have good independence between the "m" and "a" fingers?
- Is the traditional "p-a-m-i" tremolo dead?
- Practice strategies for the "p-i-m-i" (or "p-m-i-m") tremolo
- Am I making small finger movements? Pluck-return strokes and planting.
- Maintain the independence of movement between the thumb and fingers
- Train the thumb to anticipate its next position
- Thumb accuracy on alternating bass strings
- Am I playing with a beautiful tone?
- Am I keeping the thumb in the background?
- Is the amplitude or volume of the "a," "m," and "i" fingers even?
- Practice intervals and chords in various areas of the neck
- Practice the exercises with dynamics
- Optional practice technique: damp or mute the strings
- Slow-Fast practice to reduce hand and finger tension
- How to improve tremolo speed
- Diagnostics
Using the metronome
When using the metronome, it is important to always begin any exercise at a slow tempo. How slow? Slow enough that you have total control over the exercise with zero finger and hand tension. If you begin at too fast a speed, muscles will tense or clench. Even a small amount of tension in the playing mechanism will be amplified as you play faster and faster causing no end of problems. To be on the safe side, after finding the slow easy tempo at which you believe you are playing with no tension, subtract about ten beats-per-minute and begin there.
Start every day at your slow speed and increase the speed notch by notch (or in fives if your metronome is digital). Over a period of thirty to sixty minutes, increase your speed until your control falters. Do not graduate yourself to the next notch until you have complete control of the current speed setting.
Keep track each day of your starting speed and fastest speed. As you increase the fast speed, you will be able to increase your starting speed as well.
Meet or surpass your top speed every day. Keep track of your speeds. Write them down. This is precision work. Remember, never begin at too fast a starting speed that could produce tension in the hand or fingers.
Increasing the speed too much too soon usually results in practicing the tremolo unevenly or with poor technique (large finger or thumb movements, fingernail clicks, poor thumb preparation, etc.) This negates any progress you made at the slower speeds. Bad habits and unevenness learned through bad practice habits are notoriously difficult to correct.
Is my hand position correct?
It is important that "a-m-i" be in a perfect line in front of the string they are playing. To do this, some teachers recommend that the wrist be turned to the right. They further recommend that in order to do this, the player elevate the neck about ten degrees to help the wrist attain better flexibility and comfort. However, placing the wrist in this position tends to make the fingers strike the strings straight on to the fingernails producing a brighter and thinner tone. I personally don't recommend this method. However, as I will say over and over about tremolo techniques, try it out and see what you think. What doesn't work for others may work very well for you. You never know until you try it.
When you tremolo the second string and find yourself accidentally hitting the 3rd string, adjust your hand position. Move the hand closer to the floor or arch the wrist so that the fingers pull slightly more upward.
I prefer to find a hand position for a student that produces not only mechanical efficiency but produces a beautiful tone. I want to hear "Recuerdos de la Alhambra" played with a tone that is full and rich, not bright and thin.
Watch Video #1 to learn how to adjust your right-hand position to play a great tremolo:
Set the hand so that the fingers naturally contact the string with flesh and nail simultaneously. Do NOT play straight on to the nail.
Watch the video above at the 2:40 mark.
Your fingers should not be splayed apart. Splayed fingers are usually an indicator of dysfunctional tension. For most people, the fingers should hang together with minimal separation at the fingertips between "a" "m" and "i". Monitor this at slow and fast speeds. Some players do fine at slow speeds, but as they play faster the fingers tense and begin to splay apart.
Watch the video above at the 4:20 mark.
Do I have good independence between the "m" and "a" fingers?
A major cause of an uneven tremolo is a lack of finger independence between "m" and "a". Unlike "i" and "m", they have little natural independence between them. One must work consciously to develop that independence. One of the best ways to develop "m-a" independence is to practice the argpeggio patterns "p-m-a-m" and "p-a-m-a". See the "Warmup Exercises for Tremolo Practice" and this technique tip for a detailed explanation of how to practice the patterns.
Do not skip this step. Without good independence between "m" and "a," your tremolo will not be rhythmically even.
However, an alternative solution is to eliminate the "a" finger from the tremolo pattern completely. See the next section.
Is the traditional "p-a-m-i" tremolo dead"?
Should it rest in peace?
Well, it's not exactly dead, but using a different tremolo pattern may be the answer to all your troubles.
Eliminate the "a" finger and use p-i-m-i or p-m-i-m as your tremolo pattern. Usually, the "a" finger is the source of most problems when trying to play an even tremolo. In order to play the traditional "pami" tremolo pattern evenly, one must have exceptional independence between the "m" and "a" fingers. The "m" and "a" fingers do not have the natural independence between them that "i" and "m" have, or "i" and "a". Independence between "m" and "a" must be developed independently of working on the tremolo and usually takes many months to achieve.
By eliminating the "a" finger from the tremolo pattern, you are now using the strongest fingers on the right hand that already have very good independence between them from the get go.
I spoke with the outstanding guitarist, Ana Vidovic about her tremolo. She uses "p-m-i-m". I asked her how she came to use that pattern. She told me that early in her studies she couldn't get the traditional "p-a-m-i" pattern to work for her. No one told her to try "p-m-i-m". She just did it, it worked, and she has used it ever since.
I told Ana that I used "p-i-m-i". She thought that was odd. So I asked her, "If you had to choose, which of your fingers is strongest, "i" or "m"?" At first, she didn't want to admit that either one was stronger. After all, it's kind of a badge of technical mastery to say that all of one's fingers are equally strong and independent. But reluctantly, she finally admitted that "m" was stronger. I said, "Yes, that's why I use 'p-i-m-i'." The third note of the pattern should have a slight accent since metrically, the thumb is the downbeat, and the third note is the upbeat in the 4-note group. Therefore, my pattern makes more sense since it puts the stronger "m" finger on that slightly accented third note. She understood my point but thought her pattern felt more natural to play. It was a fun discussion and we both agreed to try each other's pattern.
But, the point is that a "p-i-m-i" or "p-m-i-m" tremolo pattern, omitting the "a" finger, will inherently be more even and controllable than the traditional "p-a-m-i" pattern. The downside of the "p-i-m-i" or "p-m-i-m" pattern is that some players may have difficulty playing them at fast speeds or may have problems with finger fatigue since one finger must be used twice in each cycle of the pattern.
That is why in the Warmup Exercises, I recommend practicing Étude No. 1 by Heitor Villa-Lobos with Pepe Romero's right-hand pattern (not using the "a" finger) to improve the speed and endurance of the "i" and "m" fingers.

Another solution is to alternate the patterns: p-i-m-i, then p-m-i-m, back to p-i-m-i, then p-m-i-m, etc. That approach distributes the usage of the fingers---"i" is used twice, then "m" is used twice, etc.
Practice strategies for the "p-i-m-i" (or "p-m-i-m") tremolo
As described above, the wonderful advantage of this pattern is that it does not include the "a" finger. Therefore, one of the big obstacles to tremolo mastery---"m-a" finger independence---is eliminated.
Hand position considerations and thumb training/control will be the same as for the traditional "p-a-m-i" pattern.
Because "i-m" are naturally strong and independent fingers, and because "i" is repeated in the "p-i-m-i" pattern (or "m" is repeated in the "p-m-i-m" pattern), their movements will naturally tend to be small and they will stay closer to the string. If finger movement problems are present, "i" and "m" will respond more easily to correction than if "a" were involved.
Planting will not be used in this pattern for practice or performance. Because of the repeated "i" (or "m") finger stroke, planting would create excessive finger tension.
The rest of the basic practice strategies of how to practice the tremolo remain the same.
Speed with the "p-i-m-i" or "p-m-i-m" pattern
The "im" fingers are naturally independent and fast. But some guitarists may have trouble playing the "p-i-m-i" or "p-m-i-m" pattern with the fluidity and speed of the traditional "p-a-m-i". The primary reason is fatigue. In the "p-i-m-i" pattern, the "i" finger has to play twice in each four-note cycle. In the "p-m-i-m" pattern, the "m" finger has to play twice. Therefore, the repeated finger works twice as hard as the other fingers. Playing the cycle over and over can produce fatigue that builds up, causing the repeated finger to tense up and slow down.
In this case, I find that practicing ancillary patterns is very helpful for building "p-i-m-i" or "p-m-i-m" tremolo speed. Practicing "p-i-m-i" and "p-m-i-m" arpeggio patterns is very beneficial. Practicing Heitor Villa-Lobos' "Etude No. 1" with "p", "i", and "m" (no "a" finger) helps increase the speed and decrease fatigue in the "p-i-m-i" and "p-m-i-m" tremolo patterns:
Also, many points about achieving speed with the "p-a-m-i" pattern apply to the "p-i-m-i" and "p-m-i-m" patterns. For example, don't practice exercises at starting speeds that produce finger/hand tension. And, in addition to working with the metronome to increase speed, practice with speed bursts.
Am I making small finger movements?
One of the basic requirements to produce an effortless and accurate tremolo is to make small finger movements. The range of motion must be short. If your fingers make large follow through motions or begin their stokes far from the string or high above the string, you are asking for trouble. Obviously, the further the finger is from the string the greater the chance of missing the string entirely or not hitting the sweet spot of flesh/nail contact. The greater the distance each finger has to travel, the more difficult it will be to play fast. The same holds true for the thumb. Although speed is not an issue for the thumb in the tremolo, accuracy and tone quality certainly are.
Watch Video #2 to learn how to control your finger movements:
If you begin to see your fingers making large finger movements:
1. Use pluck-release or pluck-return finger strokes. Watch Video #3 below!
The finger plucks the second string and the tension in the finger is immediately released (Pepe Romero describes it as emptying the finger of its tension). Then, the finger falls back to its position in front of the second string (by the force of gravity, not conscious effort) and remains there, ready to play again. Very little follow through exists in this stroke. Travel distance is minimized. The finger should not travel past the adjacent string. This results in excellent accuracy both in playing the correct string and hitting the precise flesh/nail contact point for best tone quality.
I use a little mental trick to help me execute this technique. I tell myself not to follow through at all with my finger stroke. Now, I know in the back of my mind I must follow through to pluck the string, but by telling myself "no follow through" it helps minimize the amount of finger travel. Here are detailed instructions and a video on how to use this technique.
Here are step-by-step instructions:
- Line up "a-m-i" in front of the second string as low above the string as you can. Keeping "i" and "m" stationary, pluck the second string with the "a" finger. It takes muscle power or muscle tension to pluck the string. Tell the "a" finger not to follow through. Try to move no further than slightly above the third string. Immediately relax the finger. Release the tension in the finger. Empty the finger of its tension. If the finger is truly relaxed, gravity will pull it back to its starting position in front of the second string. The "i" and "m" fingers should still be stationary in position in front of the second string.
- Keeping "i" and "a" stationary, pluck the second string with the "m" finger. Tell the finger not to follow through. Think small finger movement. Empty the "m" finger of its tension and it will fall back towards the floor. Stop it in front of the second string. The "i" and "a" fingers should still be stationary in position in front of the second string.
- Keeping "m" and "a" stationary, pluck the second string with the "i" finger. Tell the finger not to follow through. Think small finger movement. Release the tension in the finger and allow it to return to its position in front of the second string. The "m" and "a" fingers should still be stationary, precisely in position in front of the second string.
Watch Video #3 to learn about the pluck-release technique:
2. Use pluck-return strokes for the thumb
When the thumb plucks a string, many times it should not follow through. Rather, it should return to its starting position behind the string.
Watch Video #4 to learn how to apply the pluck-return technique to the thumb:
If the thumb is playing alternating bass notes, it must learn to anticipate its next position (see "Thumb Accuracy" below).
3. Use planting techniques to teach the fingers to make small movements and improve tone quality
Benefits of planting:
- Planting tends to keep the fingers and thumb close to the string. Staying close to the strings helps to keep tremolo finger movements small for improved accuracy.
- Planting may improve the tone quality of the thumb and fingers. Planting helps the player to consistently contact the strings with the fingers on the left side of the fingernails with the flesh and nail simultaneously. It also helps the player consistently contact the strings with the thumb on the center to right side of the thumbnail with the flesh and thumbnail simultaneously. When the thumb and fingers contact the strings correctly, the tone will be round and full, with very little extraneous noise.
Planting may be done in four ways:
1. Plant the "a" finger as the thumb plays.

Many people recommend this. It is said that if the "a" finger is planted it serves as a reference point for "i" and "m", increasing their accuracy. Also, having the "a" finger on the string keeps "i" and "m" closer to the string as well. Some say it aids in developing speed. It also aids in hand stability. And it certainly results in smaller movements of the "a" finger. One school of thought says that the planting of "a" is a practice technique for slower tempos and that as the speed is increased, the finger is no longer consciously planted. The other school of thought is that the plant is maintained even at high speeds. Try both and see what produces the best result for you. A downside of this technique is that the sound of the string is cut off every time the "a" finger is planted. Many prefer to have the sound of the note ring through as the thumb plays.
2. Plant "a" and "p" together.

Plant them immediately after the "i" finger plays. This is said to result in even greater accuracy, speed, and stability. It also specifically helps to rein in extraneous movements of the thumb and preps the thumb to play the correct string. Once again, one school of thought says this is only a practice technique. The other school of thought says this plant is used even at final tremolo speeds.
3. Sequential Planting: Plant all four fingers Option A.
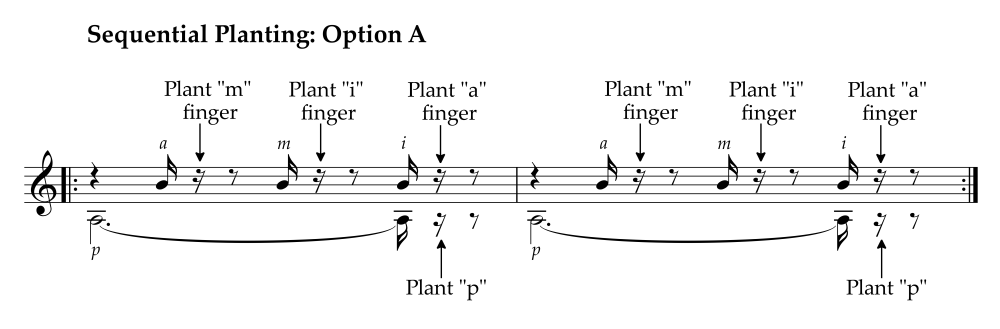
This one is more of a practice technique rather something to be used in actual playing. Here is how it works. Start with the thumb and "a" finger planted on their strings. The thumb plays. The "a" finger plays. Immediately after "a" plays, plant the "m" finger. This will cut the previously played note short (staccato). Immediately after "m" plays plant the "i" finger on the string. Again, this will cut the note just played producing a staccato. Pluck the string with the "i" finger. Immediately after the "i" finger plays, plant "p" and "a" simultaneously on the strings they will play next. This cuts off the note the "i" finger just played and cuts off the ringing bass string. At first, it is practiced at a snail's pace and will sound as notated in the following example:
4. Sequential Planting: Plant all four fingers Option B.
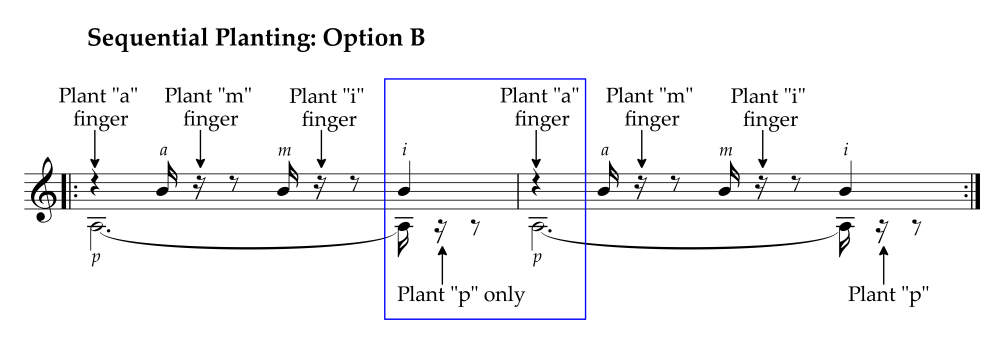
Method four is the same as method #3, except that at the end of the tremolo pattern, after the "i" finger plucks, only plant "p" on its string rather than both "p" and "a." Finally, as "p" plucks, plant "a."
Again, this is a practice technique or strategy. It is not used in performance. It definitely helps limit the movements of the fingers. Each finger stroke pulls the next finger immediately into position. As the speed is increased the individual finger preparations and the resulting staccato become less distinct. As you approach tremolo tempo (MM=144+ for a quarter note) the staccato effect disappears altogether.
Watch me demonstrate these planting techniques in this video:
Douglas Niedt states that he does not use planting in his tremolo. He says that in his experimentation with planting, it had no effect on his speed, accuracy, or control of his finger movements. But nevertheless, he highly recommends that you try it. Everyone is different. What doesn't work for someone else may be the secret you've been searching for to unlock mastery of the tremolo. Try everything. Discount nothing.
4. Practice the tremolo on the 2nd string with the fingers AND THUMB
Some teachers recommend learning the tremolo with the fingers and thumb all playing the 2nd string only. They say that practicing the tremolo on a single string will give you a good tactile sense of the evenness of the notes. The fingers will literally trip over themselves if the tremolo is moderately or severely uneven. They say that playing on a single string also makes it easier to teach the thumb to play quieter than the fingers.
Other teachers say that this practice technique certainly doesn't hurt anything but won't necessarily help improve a real tremolo where the thumb plays a separate string.
Maintain the independence of movement between the thumb and fingers
When the thumb plays, it is important that "a" "m" and "i" don't move out of their parallel position between the first and second strings. If you watch your fingers as you slowly play the "pami" pattern, you will often see your "i", "m", or "a" finger move when the thumb plays.
Try playing the sixth string with the thumb and the second string with "ami" to see if you have this problem. Play slowly. Watch the "i" finger first. Watch "m". Then watch "a":

If a finger or fingers move, slow down and be sure the fingers are totally relaxed as the thumb makes its stroke. As the thumb plays, you may have to actually oppose the pull on the finger by pushing the finger forward (towards the floor) to train the finger.
Next, practice these remaining string combinations:

You must also be able to keep the fingers in their static, parallel position between the first and second strings when the thumb is alternating bass notes. Practice these combinations. Again, each time the thumb plucks, none of the fingers should jump, bend, lift, flex, or extend:
Watch this video on how to maintain independence of movement between the thumb and fingers:
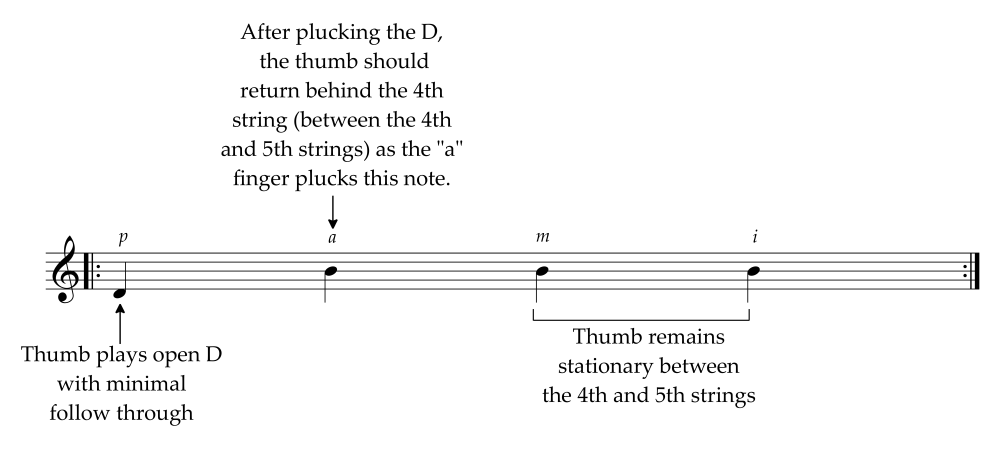
Train the thumb to anticipate its next position
The thumb must always anticipate where it is needed next. After playing a string, it should position itself behind the next string it is about to play. Obviously, this is important in order to help the thumb play accurately. It is also important so the thumb can play with minimal effort with small movements. A thumb that doesn't prepare precisely for the next string it is to play flails around wildly and can easily upset the rhythmic evenness and accuracy of attack of the "a-m-i" fingers.
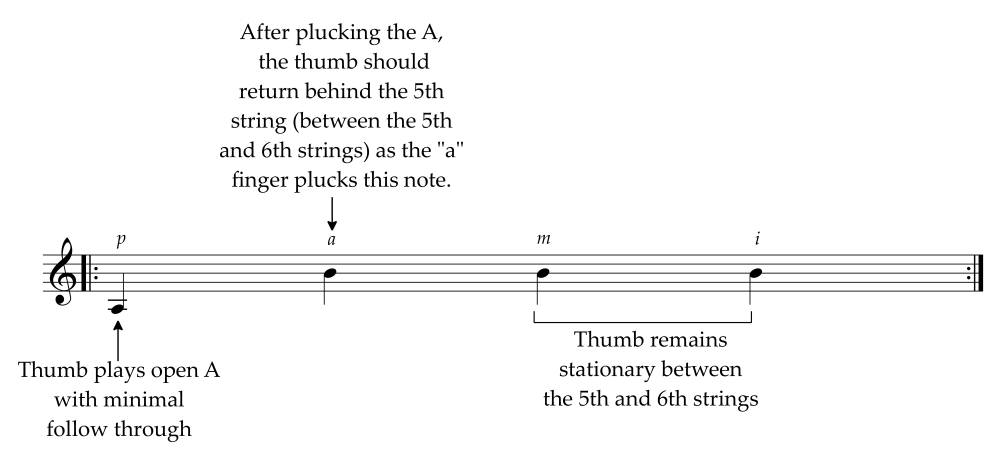
To train the thumb, let's begin with a tremolo on the single 2nd string, playing very slowly:
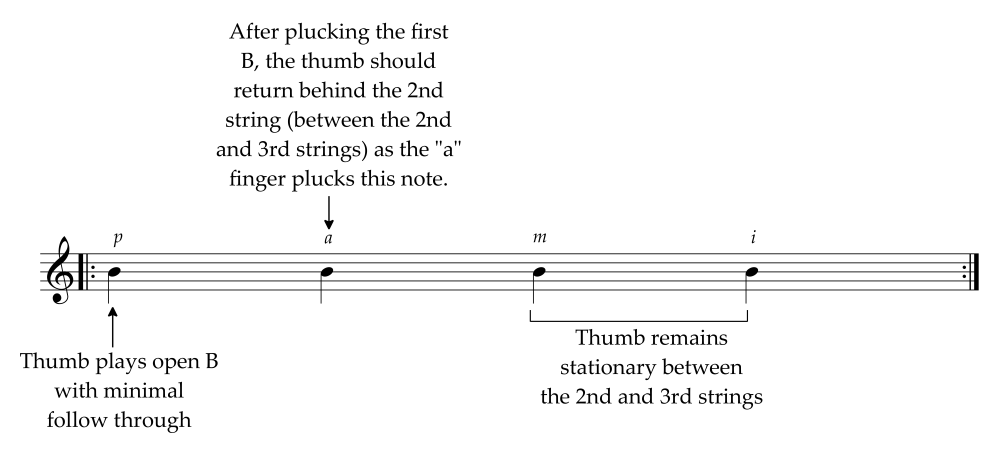
Because the thumb plays the second string repeatedly, it should pluck the string and bounce back behind the string ready to play again. Play the thumb stroke with minimal follow through. Excessive follow through results in the thumb having to scramble to return to position resulting in swatting motions. When should the thumb bounce back behind the second string? I prefer to position it as my "a" finger plays. Second choice would be as "m" plays. Positioning the thumb as "i" plays is a bit late, especially if the thumb has a big jump from say the third string to the sixth string.
After trying the single-string tremolo, try similar exercises with the fingers still playing the second string but with the thumb playing other strings, again practicing very slowly at first and then speeding up. As the distance between the string the fingers are playing and the string the thumb is playing increases, it becomes more difficult to control the thumb.
The thumb plucks the 3rd string:

The thumb plucks the 4th string:
The thumb plucks the 5th string:
The thumb plucks the 6th string:
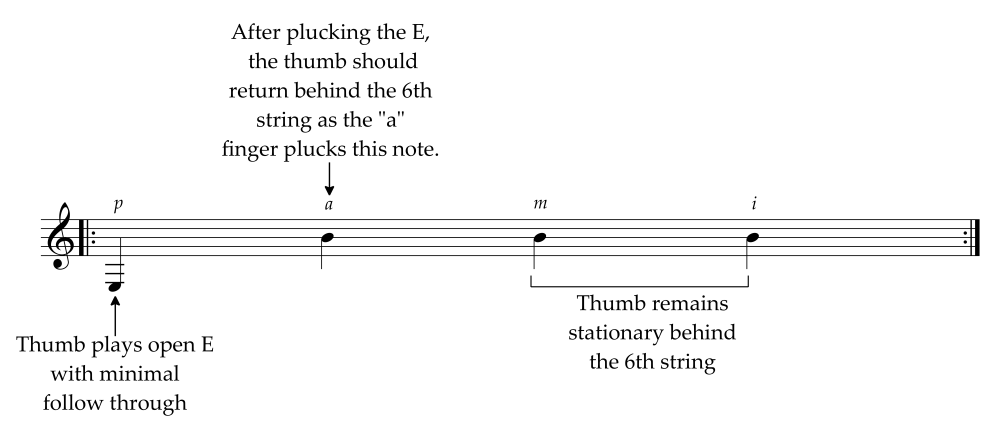
The preceding exercises will train the thumb to return to position after playing the same string repeatedly. Be sure the thumb remains stationary in position as "m" and "i" play the second string.
Watch this Video demonstrating how to train the thumb to anticipate its next position:
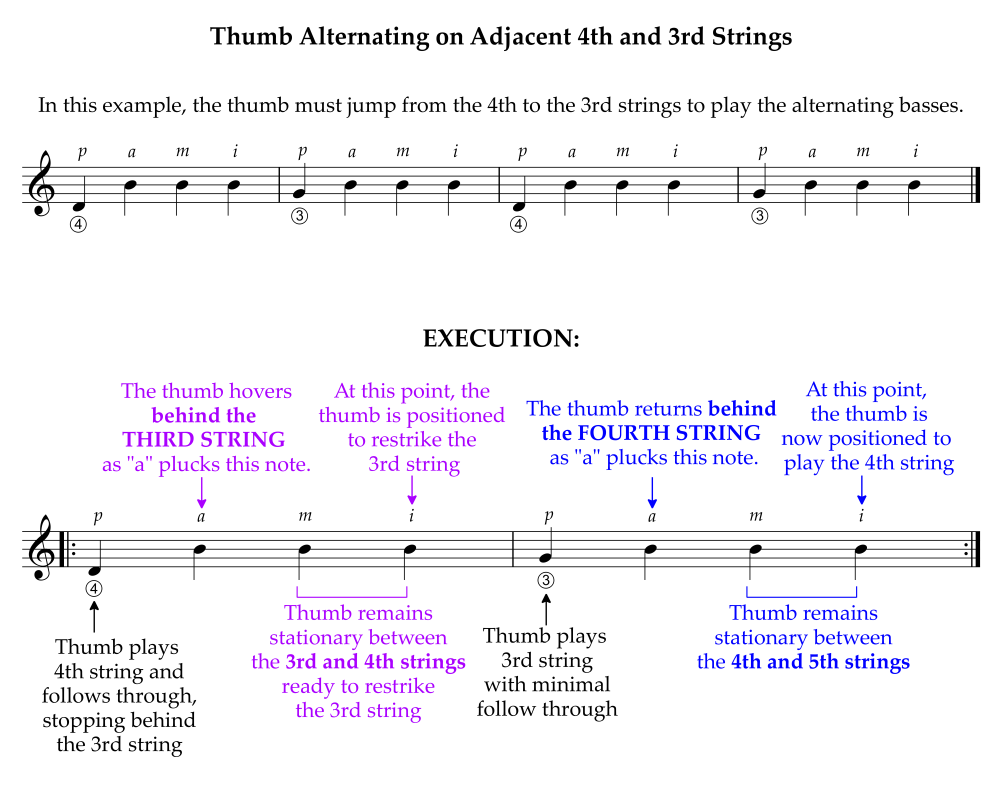
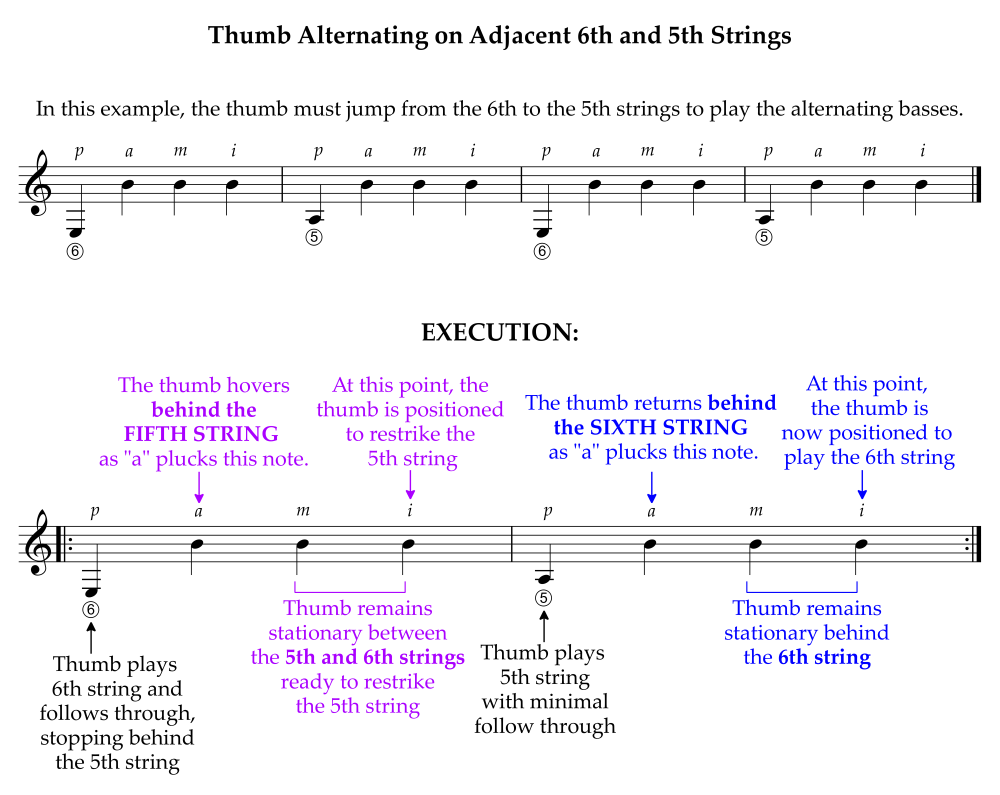
Thumb accuracy on alternating bass strings
Training the thumb to anticipate positioning itself to play alternating strings can be a difficult task. The thumb must always anticipate where it is needed next. After playing a string, it should position itself behind the next string it is about to play. Obviously, this is important in order to help the thumb play accurately. It is also important so the thumb can play with minimal effort with small movements. A thumb that doesn't prepare precisely for the next string it is to play flails around wildly and can easily upset the rhythmic evenness and accuracy of attack of the "a-m-i" fingers.
First, watch this video on how to execute descending thumb jumps in the tremolo:
Now, watch this video on how to execute ascending thumb jumps in the tremolo:
Finally, watch this video on how to execute passages with alternating bass strings:
If you are alternating the bass strings and having trouble with evenness or accuracy, here are progressive exercises to train the thumb to anticipate which string it is going to play next.
This first example shows the steps required when the thumb alternates playing notes on the adjacent 4th and 3rd strings:
This example shows the steps required when the thumb alternates playing notes on the adjacent 5th and 4th strings:

This example shows the steps required when the thumb alternates playing notes on the adjacent 6th and 5th strings:
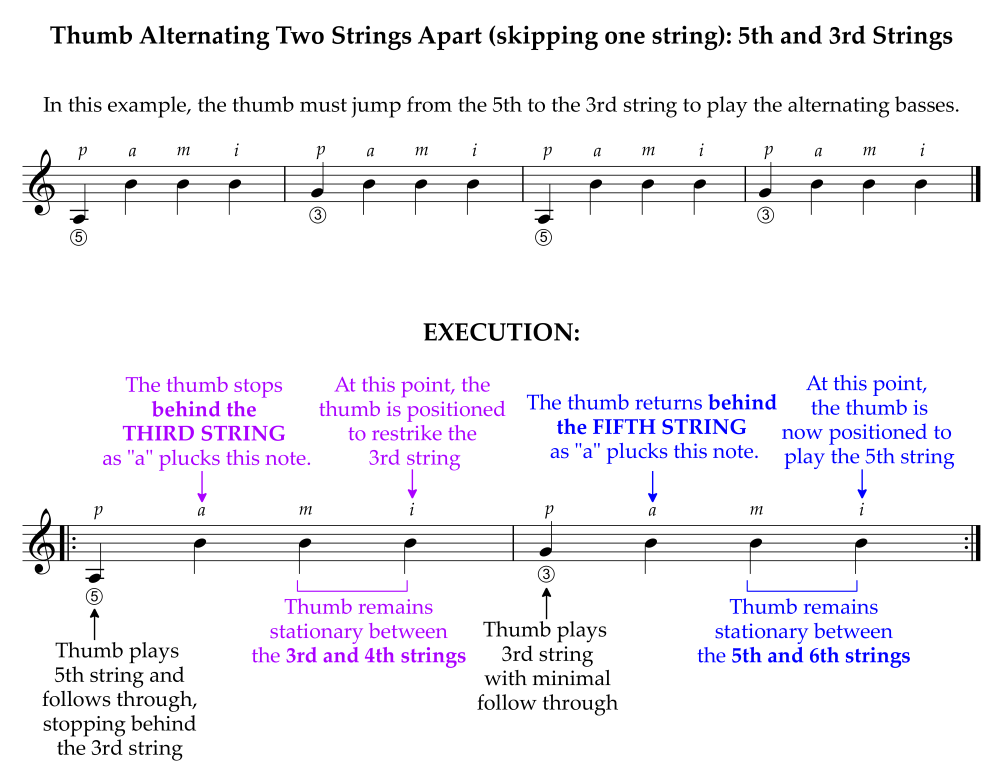
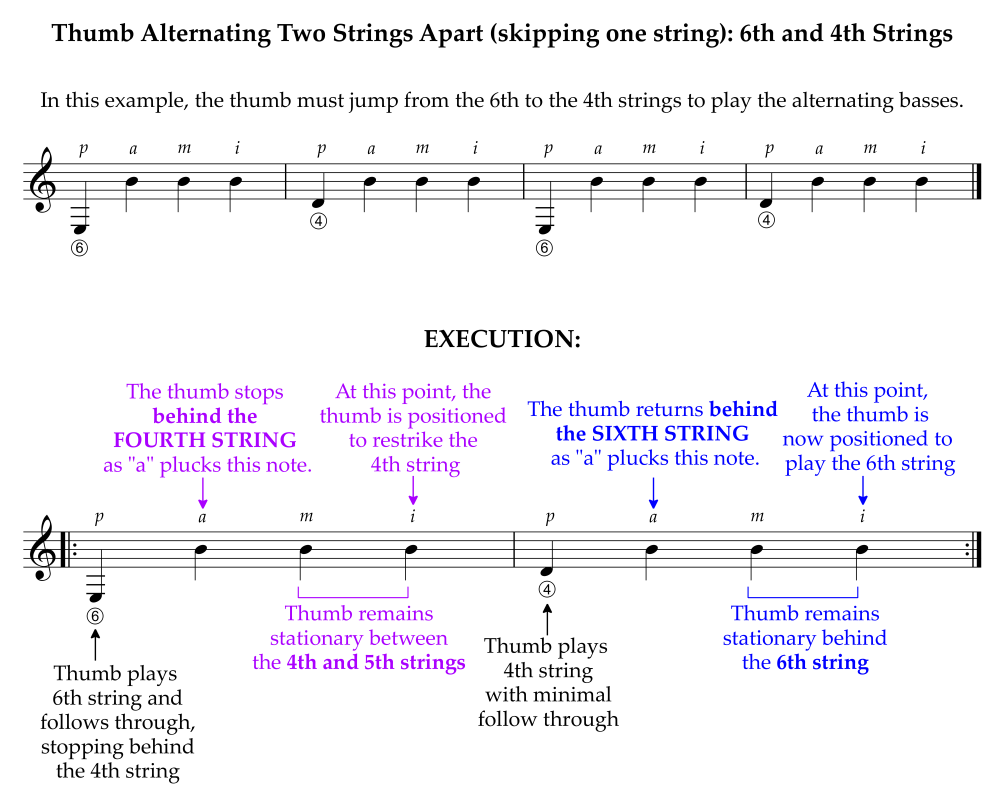
The next two examples show the steps required when the thumb alternates playing notes two strings apart (skipping one string).
Alternating on the 5th and 3rd strings:
Alternating on the 6th and 4th strings:
The next example shows the steps required when the thumb alternates playing notes three strings apart (skipping two strings).
Alternating on the 6th and 3rd strings:

You may be asking yourself, "With practice, I think I can train my thumb to position itself for the next string it has to play when I'm focused on it and playing these basic exercises. But how in the world will I do this when I change my focus and concentrate on my right-hand fingers and ultimately my left hand?" The good news is that if you practice these exercises enough, eventually the thumb will automatically position itself without conscious direction from you!
Am I playing with a beautiful tone? Am I making extraneous right-hand finger noises and clicks?
As in normal playing, fingernail noise should be minimal when executing tremolo. To achieve this, the standard flesh/nail contact on the left side of the fingernails must be maintained. Due to the speed of tremolo, fingers may occasionally miss this sweet spot, resulting in clicks or unwanted nail noise.
Accuracy of fingernail/flesh contact with the strings not only minimizes clicks and nail noises but also improves consistency in hitting the sweet spot that produces the most beautiful tone possible. Finally, it ensures that each note in the tremolo has a uniform sound, creating a smoother and more even tremolo overall.
Note that many techniques in this Technique Checkup and Review such as making minimal finger movements, using pluck-return strokes, planting, thumb techniques, and keeping the fingers independent of the thumb movements all contribute to precision in flesh/nail contact with the strings.
Fingers: Be sure to contact the strings on the left side of the fingernails. Contact the flesh and nail simultaneously.
Watch this video from 1:20-3:38 for a demonstration of how to contact the strings with the nails and flesh of the fingers:
Thumb: Ideally, contact the bass string on the center to right side of the thumbnail. As with the fingernails, contact the flesh and thumbnail simultaneously. Be sure your thumbnail is long enough to easily make contact with the string. Because of wide variations of the ratio of the length of the thumb to that of the fingers, some players may have to make adjustments to their hand position or thumb position in order to contact the strings with the left sides of the fingernails and the center to right side of the thumbnail at the same time.
Watch this video to see the details of how the thumb should contact the string:
If you play straight on to the nail so that the string contacts the left and right side of the nail, your tone will be bright and thin. Contact on the left side of the nail, flesh and nail simultaneously, produces a warm and full tone.
If your fingernail contacts the string first, you will hear an extraneous buzzy sound. If the flesh contacts the string first, you will hear a click, and it will feel like your nail is catching on the string. You must contact the string with the flesh and nail simultaneously on the left side of the nail.
Practice planting techniques to improve your nail/flesh contact with the strings. See Point #2 above: "Use planting techniques to teach the fingers to make small movements and improve tone quality."
Am I keeping the thumb in the background?
Although a few exceptions can be found, in most tremolo passages in the repertoire, the fingers carry the melody, and the thumb plays the accompaniment. Therefore, when learning the tremolo, it is important to train the thumb to play quietly. As the speed of an exercise is increased, the thumb naturally will tend to play louder. It becomes more difficult to curb this tendency at fast speeds. For this reason, if you are having trouble keeping the thumb quiet, when practicing these exercises at the recommended slow starting speeds, keep telling yourself to play the thumb very quietly or super quietly. Then, as you reach tremolo speeds of MM=144+ the balance between thumb and fingers will be correct. Proper balance of volume between the thumb and fingers is an essential element of a good tremolo.
Is the amplitude or volume of the "a," "m," and "i" fingers even?
Keep the volume of each finger the same. Do not accent any finger. The ideal length of the three fingernails will probably not be the same. If you find you are consistently accenting a certain finger, it may be an indication that fingernail is slightly too long. Warming up with and practicing the arpeggio exercises in the "Warmup Exercises for Tremolo Practice" will help build finger control and independence to keep the finger volume even.
Practice intervals and chords in various areas of the neck
Be sure to practice all tremolo exercises at various frets. Do not practice only on open strings. Why? First, the string tension of an open string is very different from a note fretted at the eighth fret for example. It's important that the fingers experience and learn to be unaffected by varying string tensions when the left hand is brought into play.
Second, you will practice most of these exercises on the second string. The open string is the same height above the soundboard as the first and third strings. However, as you ascend on a pressed-down string, the string gets closer to the soundboard than other open strings. When that happens, the "ami" fingers' movements must become even more precise and small to maintain accuracy of attack. The fingers literally have to reach deeper down or into the guitar (closer to the soundboard) to pluck the string.
I provide you with a list of intervals from "Recuerdos de la Alhambra" and "Una Limosna por el Amor de Dios" in case your goal is to eventually learn one of those pieces. But whether you choose from those lists or use other intervals, be sure to practice intervals in different areas of the neck.
Watch this video for details:
Practice the exercises with dynamics
Remember, the tremolo is a musical technique. When playing repertoire, we must have the technical ability to play the tremolo at varying degrees of volume in order to play expressively. It is not to be played as a monotone mechanical exercise. I don't care how fast you can play a tremolo or how rhythmically evenly you can play it. If you play a piece such as Recuerdos de la Alhambra with a machine gun-like technical perfection without gradations of volume and speed, you will kill the piece.
Practice all the tremolo exercises at normal volume, loud volume, and soft volume---three distinct levels. This will develop your right-hand touch. Practicing at different volume levels will increase your hand and finger strength and overall control. Also practice crescendos and decrescendos. Because one's tendency is to slow down when playing quietly and speed up when playing loudly, dynamics should be practiced with a metronome much of the time. The ability to vary the volume of the tremolo at will is an essential part of mastering the tremolo.
Optional practice technique: damp or mute the strings (the "Handkerchief Trick")
Some guitarists find it helpful to damp or mute the strings with the left hand or stuff a cloth or Kleenex under the strings at the bridge or the upper frets past the 12th fret. Or, use a mute made expressly for this type of practice . You can use this strategy on any tremolo exercise. This strategy gives the player a heightened tactile and aural sense of the string plucks, helping to maintain a rhythmically-even tremolo. Similarly, Agustin Barrios, composer of the famous tremolo piece, "Una Limosna por Amor de Dios," advised one of his students, Cecilio Orellana, to practice the tremolo on the harmonics of the 12th fret to refine his tremolo. Doing so has a similar effect of damping the strings to increase tactile sensitivity of the right hand and aural awareness.
Watch this video for details on the "Handkerchief Trick":
Slow-Fast practice to reduce hand and finger tension
Slow-Fast practice (alternating groups of slow and double-speed notes) is especially helpful for reducing finger and hand tension as you speed up your tremolo. Here is an example of some practice combinations:

Playing the slow notes makes you aware of any excess finger/hand tension and gives you time to let it dissipate. The number of slow cycles versus fast cycles can be varied as needed. Add additional slow cycles to allow more time for the muscles to relax and any tension to dissipate.
The overall tempo and number of repeated fast groups can be increased as your proficiency improves. If you are practicing with staccato, as you increase the tempo, the amount of staccato will decrease.
Practice on intervals at various areas on the fretboard, at varying degrees of loud and soft volumes, and even with crescendos and decrescendos. For example, you could play a pattern loud the first time and soft on the repeat or vice versa. Or, crescendo the first time and decrescendo on the repeat or vice versa.
As with all your tremolo practice, start at a slow metronome speed and gradually increase it. You can also do Slow-Fast practice without a metronome.
Watch me demonstrate Slow-Fast practice in this video:
How to improve tremolo speed
Some players develop a rhythmically even tremolo but can't play it fast. They increase their speed on the metronome and then hit a wall. No matter how much they work at it, they can't get past that tempo.
Several things could be the culprit. The range of motion of their finger movements may be too wide. They may have excessive tension in their hands or fingers. They may be trying to play too fast too quickly. Or, when they practice their exercises, they may begin at too fast a tempo.
Remedies include reining in the finger movements and practicing their exercises at starting tempos slow enough that zero tension is present in the fingers and hand. Planting may be helpful. All of these topics and their solutions were addressed above.
But another cause of speed problems can be related to metronome practice itself. As much as I recommend the use of the metronome, some people have trouble getting past a certain tempo because they are trying too hard to keep up with the metronome. Or they may be trying too hard to control each note of the tremolo and aren't thinking of it in terms as a four-note group. The cure is to still use the metronome but focus more on speed burst practice. In other words, continue to practice with the metronome to focus on evenness and control. But alternate that with "letting it fly". Let it happen. Try practicing on the first string so you don't have to worry about hitting adjacent strings. Play in speed bursts of two, three, four, and more notes without trying to control the fingers or rhythmic precision. Let 'em fly. It might be sloppy and uneven at first, but sometimes you must get that feeling of letting go in order to play fast.
For a quick overview of how to practice speed bursts, watch these two videos:
For deeper understanding and in-depth videos on how to practice the tremolo with speed bursts, see this technique tip .
Diagnostics
The Tremolo Wizard provides precise information about the rhythmic evenness and volume evenness of your tremolo. However, you might also find that apps that slow down the playback of your tremolo without changing the pitch are also useful. But more importantly, you can record video into these apps, play it back at reduced speeds to analyze the visual aspects of your tremolo. Are the fingers following through too far? Is a finger kicking forward when the thumb plays? Is the thumb swatting at its strings?
You can find many computer apps that will slow down the playback of music without changing the pitch. My favorite is "Transcribe!". Yes, the name includes the exclamation point---kind of like the musical, "Oklahoma!". It is available as a download from SeventhString.com . They offer a 30-day free trial. The one-time purchase price is very reasonable.
This first video demonstrates how to use "Transcribe!" to analyze the rhythmic evenness of your tremolo:
This second video demonstrates how to use "Transcribe!" to slow down a video of your tremolo playing, so you can visually analyze your technique to correct any problems. Watch:
Before you continue...
We recommend printing this comprehensive guide or saving it to your computer for your future reference.